
Yoga for Everyone

THE AUTHOR OF THIS ARTICLE IS THE NEW YORK TIMES CONTRIBUTOR, KELLY COUTURIER
It’s time to roll out your yoga mat and discover the combination of physical and mental exercises that for thousands of years have hooked yoga practitioners around the globe. The beauty of yoga is that you don’t have to be a yogi or yogini to reap the benefits. Whether you are young or old, overweight or fit, yoga has the power to calm the mind and strengthen the body. Don’t be intimidated by yoga terminology, fancy yoga studios and complicated poses. Yoga is for everyone.
10 Yoga Poses You Need to Know
The building blocks of yoga are poses. These are good ones to learn as you build a regular yoga practice.
These 10 poses are a complete yoga workout. Move slowly through each pose, remembering to breathe as you move. Pause after any pose you find challenging, especially if you are short of breath, and start again when your breathing returns to normal. The idea is to hold each pose for a few, slow breaths before moving on to the next one.
Child's Pose
This calming pose is a good default pause position. You can use child’s pose to rest and refocus before continuing to your next pose. It gently stretches your lower back, hips, thighs, knees and ankles and relaxes your spine, shoulders and neck.
Do it: When you want to get a nice gentle stretch through your neck spine and hips.
Skip it: If you have knee injuries or ankle problems. Avoid also if you have high blood pressure or are pregnant.
Modify: You can rest your head on a cushion or block. You can place a rolled towel under your ankles if they are uncomfortable.
Be mindful: Focus on relaxing the muscles of the spine and lower back as you breathe.

Child’s Pose
This should be your go-to pose whenever you need to rest for a moment during a yoga workout.
STEPS:
1. Kneel on your hands and knees, with your hands in front of your shoulders and your knees about hip width apart, or wider if that is more comfortable and your big toes touching.
2. As you exhale, lower your buttocks toward your heels as your torso rests on your thighs, or between your thighs, and your head rests on the floor or a block or cushion.
3. Rest your arms alongside the thighs, palms facing up.
4. Release the muscles around the spine and hips and take several slow breaths.
Downward-Facing Dog
Downward-facing dog strengthens the arms, shoulders and back while stretching the hamstrings, calves and arches of your feet. It can also help relieve back pain.
Do it: To help relieve back pain.
Skip it: This pose is not recommended if you have carpal tunnel syndrome or other wrist problems, have high blood pressure or are in the late stages of pregnancy.
Modify: You can do the pose with your elbows on the ground, which takes the weight off your wrists. You can also use blocks under your hands, which may feel more comfortable.
Be mindful: Focus on distributing the weight evenly through your palms and lifting your hips up and back, away from your shoulders.

Downward-Facing Dog
This is one of the most common yoga poses.
STEPS:
1. Start on your hands and knees, with your hands shoulder-distance apart and your knees under your hips, toes tucked.
2. Inhale, press evenly into your palms and raise your knees off the ground.
3. Lift your hips up and back, working to lengthen your spine.
4. Exhale as you begin to straighten your legs as much as possible, heels reaching toward the ground. If your legs are straight, lift the thigh muscles strongly up as you press into the ground with your feet.
5. Lift the shoulders away from the ears and flatten the shoulder blades on your back. Rotate your upper arms down towards the floor. Firm your outer hips in toward the center.
6. Keep inhaling and exhaling evenly as you hold the pose.
Plank Pose
A commonly seen exercise, plank helps build strength in the core, shoulders, arms and legs.
Do it: Plank pose is good if you are looking to tone your abs and build strength in your upper body.
Skip it: Avoid plank pose if you suffer from carpal tunnel syndrome. It can be hard on your wrists. You might also skip it or modify if you have low back pain.
Modify: You can modify it by placing your knees on the floor.
Be mindful: As you do a plank, imagine the back of your neck and spine lengthening.

Plank
This common pose can build strength in the core, shoulders, arms and legs.
STEPS:
1. Begin in Downward-Facing Dog pose.
2. Inhale and shift forward until your body is in a straight line, shoulders stacked over your wrists and heels above the balls of the feet.
3. Exhale as you press down through your forearms and hands, gazing at the floor in front of you. Imagine the back of your neck and spine lengthening.
4. Keep breathing steadily as you hold the pose for as long as you can, engaging the core muscles by drawing your navel into the body and toward your spine. Keep your thighs lifted and your hips high, but don’t let your rear stick up too high.
Four-Limbed Staff Pose
This push-up variation follows plank pose in a common yoga sequence known as the sun salutation. It is a good pose to learn if you want to eventually work on more advanced poses, such as arm balances or inversions.
Do it: Like plank, this pose strengthens arms and wrists and tones the abdomen.
Skip it: If you have carpal tunnel syndrome, lower back pain, a shoulder injury or are pregnant.
Modify: It’s a good idea for beginners to modify the pose by keeping your knees on the floor.
Be mindful: Press your palms evenly into the floor and lift your shoulders away from the floor as you hold this pose.
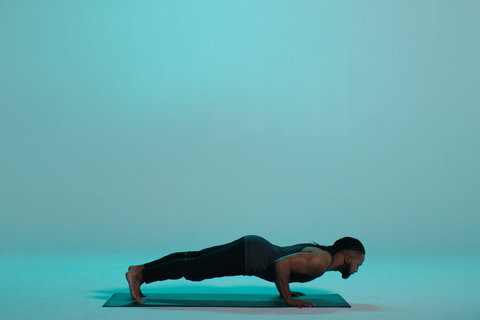
Four-Limbed Staff Pose
This pose builds strength in the arms, shoulders, wrists and back and helps tone the abdomen.
STEPS:
1. From plank pose, inhale and shift forward, reaching your sternum forward until your shoulders are slightly forward of your wrists and you are on the balls of your feet. Flatten your shoulder blades on your back as you lift your thighs and front torso away from the floor. Draw the abdominal muscles up toward the spine.
2. Exhale and bend the elbows straight back — not out to the sides — as you lower your body in a straight line until it is a few inches above the floor. Make sure your shoulders don’t dip below the level of your elbows. If you are a beginner, drop your knees to the mat before lowering.
3. Hold the pose for a few breaths.
Cobra Pose
This back-bending pose can help strengthen the back muscles, increase spinal flexibility and stretches the chest, shoulders and abdomen.
Do it: This post is great for strengthening the back.
Skip it: If you have arthritis in your spine or neck, a low-back injury or carpal tunnel syndrome.
Modify: Just lift up a few inches, and don’t try to straighten your arms.
Be mindful: Try to keep your navel drawing up away from the floor as you hold this pose.
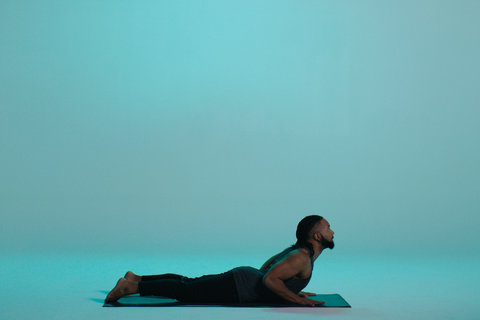
Cobra Pose
One of the simpler back-bending poses.
STEPS:
1. Lie flat on your belly with your forehead on your mat and your toenails pressing into the mat.
2. Place your hands under your shoulders, keeping your elbows close to your torso. Draw your navel up away from the mat.
3. Inhale and press your feet and legs into the mat, releasing your tailbone down toward your pubis as you begin to straighten the arms to lift your head and chest forward and up off the floor. Exhale.
4. Inhale as you widen the chest and hold here for another breath or two.
5. On an exhale, lower your head, neck and chest onto the floor.
Tree Pose
Beyond helping improve your balance, it can also strengthen your core, ankles, calves, thighs and spine.
Do it: Great for working on your balance and posture.
Skip it: You many want to skip this pose if you have low blood pressure or any medical conditions that affect your balance.
Modify: Place one of your hands on a wall for support.
Be mindful: Focus on your breath in and out as you hold this pose.

Tree Pose
This balancing pose is one of the most recognized poses in modern yoga.
STEPS:
1. Stand on your mat, with your feet together, or slightly apart, if that is more comfortable. Take a couple of breaths.
2. Slowly shift your weight to your right leg.
3. Raise your left leg and clasp your ankle to guide the sole of the left foot to the inner thigh of the right leg. Try to keep your hips level.
4. Press your foot against your thigh and your thigh against your foot. Lift up through your standing leg, core and chest.
5. Breathe regularly as you hold the pose for a few breaths. You can bring your palms together at your chest, or raise your arms above your head if you feel stable enough.
6. Lower your left leg and try the other side.
Triangle Pose
Triangle, which is a part of many yoga sequences helps build strength in the legs and stretches the hips, spine, chest, shoulders, groins, hamstrings and calves. It can also help increase mobility in the hips and neck.
Do it: This pose is great for building strength and endurance.
Skip it: Avoid this pose if you have a headache or low blood pressure.
Modify: If you have high blood pressure, turn your head to gaze downward in the final pose. If you have neck problems, don’t turn your head to look upward; look straight ahead and keep both sides of the neck long.
Be mindful: Keep lifting your raised arm toward the ceiling. It helps keep the pose buoyant.

Triangle Pose
This pose can be found in many yoga sequences.
STEPS:
1. Take a wide stance, with your feet three and a half to four feet apart, depending on your size; taller people can take a wider stance.
2. Turn your left foot slightly to the right and your right foot out to the right 90 degrees. Your front heel should be in line with the arch of your back foot. Firm your thighs and make sure that the center of the right knee is in line with the center of the right ankle.
3. Inhale and raise your arms out to the sides, shoulder height.
4. Exhale and reach your right arm to the right, lengthening your torso directly over the right leg as you move your hips to the left.
5. Rest your right hand on your shin, ankle, or the floor outside your right foot. Keep the sides of the torso long.
6. Stretch your left arm toward the ceiling, in line with the tops of your shoulders. Turn your torso up toward the ceiling. Keep your head in a neutral position or turn it to the left, eyes gazing at the left thumb.
7. Stay and breathe for a minute; then come up and try the other side.
Seated Half-Spinal Twist Pose
This twisting pose can increase the flexibility in your back, while stretching the shoulders, hips and chest. It can also help relieve tension in the middle of your back.
Do it: To release tight muscles around the shoulders and upper and lower back.
Skip it: If you have a back injury.
Modify: If bending your right knee is uncomfortable, keep it straight out in front of you.
Be mindful: Lift your torso with each inhale, and twist as you exhale.

Seated Half Spinal Twist Pose
Want to relieve the tension in your back? Try this twisting pose.
STEPS:
1. Sit up on the floor or a folded blanket, with your hands on the floor or blanket behind you for support. Straighten your legs out in front of you.
2. Bend your right knee and place your right foot to the outside of your left knee.
3. Inhale, lengthen your torso, exhale and twist toward your right, either hugging your right knee with your left arm or placing your left upper arm on the outside of your right leg near the knee.
4. Take several breaths here, lifting up through the sternum on the inhale and twisting a little more on the exhale, keeping the upper back wide.
5. Release the twist and try the other side.
Bridge Pose
This is a back-bending pose that stretches the muscles of the chest, back and neck. It also builds strength in the back and hamstring muscles.
Do it: If you sit most of the day, this pose will help you open your upper chest.
Skip it: Avoid this pose if you have a neck injury.
Modify: Place a block between your thighs to help keep the legs and feet in proper alignment. Or you can place a block under your pelvis if your lower back is bothering you.
Be mindful: While holding this pose, try to keep your chest lifted and your sternum toward your chin.

Bridge Pose
This pose, from the back-bending family of yoga poses, is great for stretching the muscles of the chest.
STEPS:
1. Lie on your back on your mat. Bend your knees and set your feet on the floor, with your heels close to your torso. Place your arms alongside your hips, palms down. Inhale.
2. Exhale and, pressing your inner feet and palms into the floor, lift your hips up. Keep your thighs and inner feet parallel.
3. Clasp the hands together underneath you if you can and extend through the arms to help you stay on the tops of your shoulders.
4. Lift your buttocks until the thighs are about parallel to the floor. Use your legs to support the lifting of the pelvis. Lengthen the tailbone toward the backs of the knees. Lift the pubis toward the navel.
5. Lift your chin slightly away from the sternum and, firming the shoulder blades against your back, press the top of the sternum toward the chin.
6. Stay in the pose for a few even breaths. On an exhalation, release and roll the spine slowly down onto the floor.
Corpse Pose
Like life, yoga classes typically end with this pose. It allows for a moment of relaxation, but some people find it difficult to stay still in this pose. However, the more you try this pose, the easier it is to sink into a relaxing, meditative state.
Do it: Always!
Skip it: If you don’t want to have a moment’s peace.
Modify: Place a blanket under your head, if that feels more comfortable. You can also roll up a blanket and place that under your knees, if your lower back is sensitive or bothering you.
Be mindful: Feel the weight of your body sinking into your mat one part at a time.

Corpse Pose
Though it may not look difficult, it can be quite challenging to lie in corpse pose for an extended period of time.
STEPS:
1. Lie down on your back.
2. Straighten both legs along the floor; the feet can turn out slightly. If your lower back is uncomfortable, you can place a rolled-up blanket under your knees.
3. Your arms can rest a few inches from your body, with the backs of the hands on the floor. Make sure the shoulder blades are resting evenly on the floor.
4. Fully release your weight into the mat and let your muscles relax. Breathe normally.
| Original Publication can be found here. |
